Snow Leopard on Gigabyte 965P-DS3 or DS4 motherboard, a brief guide.
This post has been a long time coming. I had promised something on these lines the previous week when I managed to boot my Hackintosh (see specs) in Snow Leopard. Like almost everyone, I installed from Leopard on to another partition. Wrought with its own challenges, this is however, the easiest way of getting Snow Leopard installed.
 I, however, am on the quest for the holy grail – Vanilla Snow Leopard, installed the retail method. I haven’t yet reached that goal, but I am getting there. This is a mini-guide on how to get Snow Leopard installed as the only OS, via a USB boot loader. This guide is generic enough and can be applied to other motherboards and configurations as well.
Here’s a brief rundown of the procedure: first, we’ll restore the retail Snow Leopard DVD on to a partition or a thumb drive (at least 7 GB). We will install the Boot loader in the USB thumb drive so that we may boot from it and kickstart the Snow Leopard installation. Once the installation is over, we will boot into Snow Leopard with the USB boot loader and install the boot loader on the Snow partition.
What you will need to install via the USB thumb drive-
- Chameleon 2.0 RC1
- PCI EFI 10.1 Boot file from Netkas
- KEXTs (generic and for your system)
- com.apple.Boot.plist with your EFI String.
- DSDT.aml for your system
- Retail DVD (buy one. Please.)
- Working Leopard Installation (just to get us started)
- USB Thumb Drive (at least 100 MB)
- A partition to restore the DVD/Image to, no less than 7 GB. Either on the Thumb Drive or on another HDD, or you can partition your own HDD
We begin by restoring the Snow Leopard DVD on to a partition. I strongly recommend using another drive if you have one. For instance if you have an external USB drive that is at least 8 GB, you can restore the DVD to that drive. Or if you have a second HDD in your system, partition off 8 GB using Disk Utility (easy if you have a GUID partition), and restore the Snow Leopard DVD. It is rather easy to restore: open Disk Utility and select the drive you want to restore to, and right click to select Restore from the menu. Point the source to the Snow Leopard Image/DVD and the destination – your new partition.
Once that is done, install Chameleon on to your USB Thumb Drive. It might fail at the end, but don’t worry that’s normal. Now take the Boot file from the PC EFI 10.1 (Netkas) and copy it to the Thumb Drive overwriting the old Boot file. This 10.1 Boot is rock stable and already 64 Bit compatible. Using Chameleon RC1 boot file has proven cumbersome for some.
Next, copy the KEXTs to the Thumb Drive’s /Extra/Extensions. One BIG note here. Do not add any extraneous KEXTs, like a patched AppleHDA, or IONetworkingFamily.kext, or IOAHCIBlockStorageInjector.kext, as these WILL cause a KP (Kernel Panic) during install. Believe me, I ran into literally dozens of such KPs before I realized this info. My recommendation is to only keep the following KEXTs on the Thumb Drive (in the Archive).
- OpenHaltRestart.kext
- NullCPUPowerManagement.kext
- fakeSMC.kext
You will need Graphics enabled for your system. By which I mean either an EFI string for your Graphics card, or some other mechanism (DSDT?). It is a critical component. For many the installation won’t start because of this. So make sure you have the EFI string in your com.apple.Boot.plist. Additionally, I also recommend booting with the arch=i386 flag. There’s a difference between the arch=i386 and -x32 flags. The former will load 32 bit KEXTs and the latter forces a 32 bit kernel. For maximum compatibility I recommend using both, but just add the arch=i386 flag to the com.apple.Boot.plist.
Kernel Flags arch=i386 GraphicsEnabler y device-properties YOUR EFI GFX STRING HERE
And finally, the most important aspect for Snow Kitty – DSDT.aml. A ton of literature is freely available to educate you on this, but for our purposes, it suffices to remark that DSDT is a very important component of the Snow Leopard install. Luckily it is rather easy to create a DSDT for your system. A number of tools for Windows and OSX (here) will create a DSDT, which though might not make all your devices work out of the box, but will indeed work with Snow Leopard. You can play around with entering Ethernet and Sound customizations in your DSDT once you are in Snow Leopard.
So go ahead, create a DSDT.aml for your system. One tweak is needed to ensure that your CMOS doesn’t reset every time you reboot in Snow Leopard. Nasty business that. Edit your DSDT.aml as specified here.
Place the patched DSDT.aml in /Extra/ on your Thumb Drive. You are ready. No need to correct permissions on the Thumb Drive or create an Extensions.mkext. Of course if you want to, here’s how.
sudo chown -R root:wheel /Extra/Extensions/
sudo chmod -R 755 /Extra/Extensions/
Reboot! And press F12 or the corresponding key on your system to bring up the Boot Menu. Select the USB Thumb drive in the list and hopefully you’ll be greeted with the Boot Menu. Go over to the partition to which you restored the Leopard DVD/Image. Don’t press Enter, rather enter extended boot arguments
-x32 -v
If all goes well, you’ll be in the Snow Leopard installation. Proceed as always. Use Disk Utility to erase your Leopard installation (why would you need it now?) and install all that you need. If any KPs occur, check the KEXTs in the USB thumb drive, and your DSDT.aml. But, if you have taken the proper precautions, it will all be fine.
Finish the installation and boot once more from your Thumb Drive. This time however, choose to boot from the new Snow Leopard installation, with the same boot flags as before (-x32 -v -f). Fly through the welcome screen and set up your account. It should be rock solid and stable thus far.
Post Installation
Now to bring it full circle. The post installation procedures. You can use the three KEXTs from the Thumb drive, as well as your DSDT.aml. But depending on your configuration, you might need more KEXTs/Injectors for your sound card, etc.
Here’s what you will need:
- Kext Utility for Snow Leopard (64 Bit)
- Chameleon 2.0 RC1
- Netkas PC EFI 10.1
- KEXTs for your system
- DSDT from the Thumb Drive
- KEXTs from your Thumb Drive
Install Chameleon 2.0 RC1 to the Snow Leopard installation. Replace the boot file with that by Netkas. Basically, follow the same steps as before, instead this time copy all the KEXTs and DSDT to the /Extra/Extensions and /Extra respectively, on the Snow Leopard installation drive. This time however, include fixes for your specific hardware. And this is key – repair permissions and rebuild the kextcache anytime anything changes in /Extra/Extensions. This is key. I can’t stress this enough. You WILL get a KP otherwise.
Graphics
Assuming you have EFI strings in your com.apple.Boot.plist, you are good to go.
Audio
I am a bit ashamed to say, I had it with my ALC888 sound card, and chose to purchase a USB sound device that works out the box with Leopard. I didn’t expect much from this nine dollar purchase, but wow, I am quite impressed with the sound – clarity and deeper tones compared to the ALC888! However, you might want to crawl through InsanelyMac to search for solutions for your specific card. ALC888 works for some with DSDT and for some not. I was in the latter half of the population.
Ethernet
965P-DS4 or DS3 version 3.3 features the Marvell Yukon 88E8056 Gigabit ethernet chip, which is unfortunately not supported out of the box in Snow Leopard. You will need to edit the IONetworkingFamily.kext, found in your /System/Library/Extensions/. I would recommend copying this KEXT to your /Extra/Extensions and editing it there. Right-click on the KEXT and select Show Package Contents. In Contents->PlugIns->AppleYukon2.kext (show Package Contents)-> Contents->Info.plist. Search for 88E08053.
Yukon-88E8053 change toYukon-88E8056
0x436211ab change to0x436411ab
Yukon Gigabit Adapter 88E8053 Singleport Copper SA change toYukon Gigabit Adapter 88E8056 Singleport Copper SA
And save the plist. You are set with Ethernet.
Orange e-SATA icons
Copy the IOAHCIBlockStorageInjector.kext to the /Extra/Extensions folder.
You are set. Edit the com.apple.Boot.plist and remove arch=i386.
arch=i386
Use the Kext Utility to build Extensions.mkext in the /Extra folder. Reboot.
Boot from the main drive now, and choose the Snow Leopard installation, and type the boot flags:
-x32 -v -f
Boot into the Snow Leopard desktop, and run Kext Utility once again. Reboot
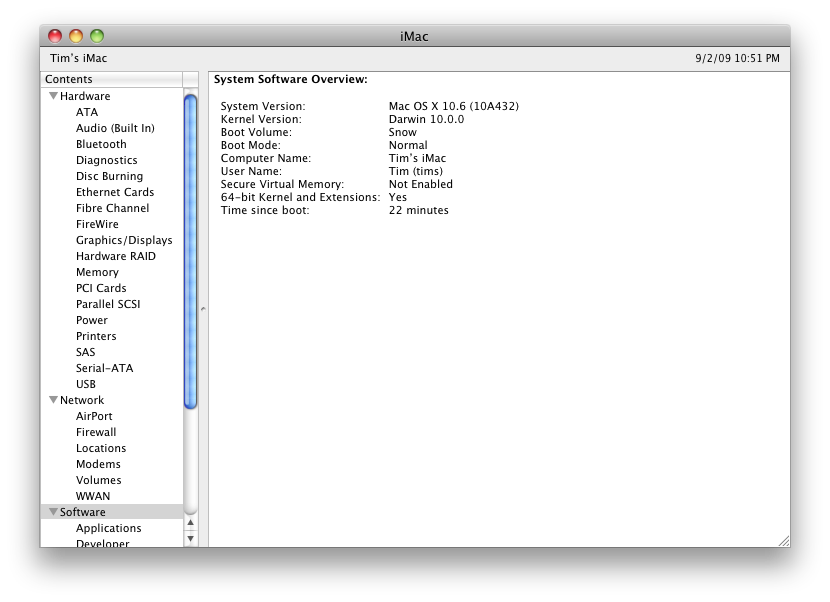
Boot from the main drive and choose the Snow Leopard installation. No boot flags required this time. Boot into a 64 Bit desktop! Congratulations.